In this post you can find how to clean up disk space on your Linux Mint. Running out of space for Linux systems can cause different problems like login loop, performance and more.
Modern Operating Systems like Linux Mint and Ubuntu generated huge amounts of clutter, logs, archives and cache. For old and cheap laptops, virtual machines, small SSD disks and servers - space is essential - and in this article you will find how to free up disk space.
Step 1: How to check free space on Linux Mint
By terminal commands
There are two different ways to check disk space. The first one is by using terminal and check the space with commands like:
df -h
output:
Filesystem      Size  Used Avail Use% Mounted on
udev            4.8G     0  4.8G   0% /dev
tmpfs           976M  1.1M  975M   1% /run
/dev/sda1        20G   14G  6.3G  69% /
or
ls -l
output:
drwxr-xr-x 2 xnav xnav  4096 Aug 28  2019  Music
drwxr-xr-x 2 xnav xnav  4096 Apr 16 17:00  Pictures
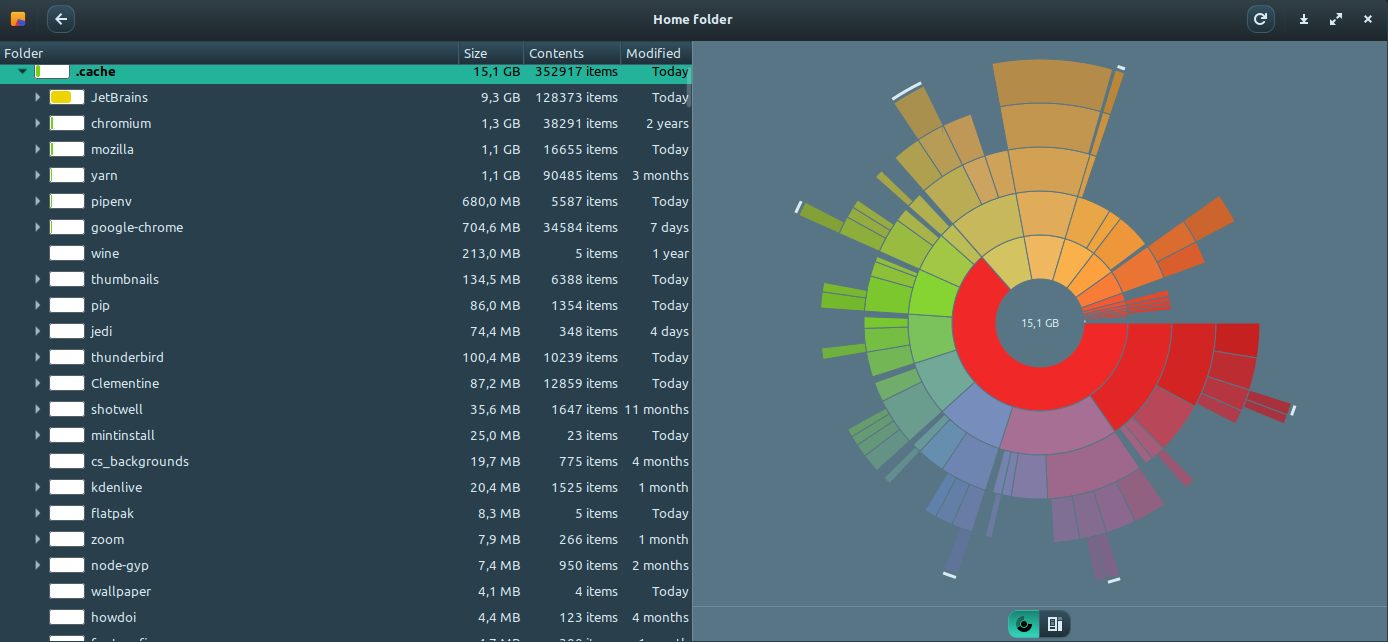
Disk Usage Analyzer - UI tool for checking disk space in Linux Mint
The second one is more user friendly and it's by using the UI tool called Disk Usage Analyzer:
- Menu
- Disk Usage Analyzer
- Select folder - i.e. /home/user
- Analyze the results
- if you hover your mouse on a given segment you can see details about the folder and space
- by clicking you will analyze only this folder
Usually I've check and clean 3 - 5 big folders. After that I rescan the home folder again.
The interface is simple and interactive. You can select any folder or subfolder and check for more details:

Step 2. Empty Trash
Linux Mints automatically keep deleted items which are deleted only by: Delete. It stores those files in a hidden directory in your user account at the location ~/.local/share/Trash/files.
Over time, the number of files in Trash might increase significantly. Moreover, if you delete huge files. You can check the Trash by the command below:
ls -al ~/.local/share/Trash/files
or by opening it:
- Menu
- Files (or opening Nemo)
- from Bookmarks select Trash
- or Go ( from top menu ) / Trash
- Empty Trash - to delete files permanently
Deleted files might take a great amount of space -** so Trash can be cleaned frequently** or you can use Shift + Delete in order to permanently delete files.
Step 3: Delete old and not required packages/kernels and APT cache
Linux Mint installs dependencies for some packages. If such a package is deleted - some dependencies might stay on your machine. In this case commands like:
sudo apt-get autoclean && sudo apt-get autoremove
will remove automatically packages and dependencies which are not needed anymore.
This command will clean up old Kernels. Linux Mint keeps several versions of Kernel which is useful in some situations. This command doesn't delete all Kernels but only really old ones.
Example output:
Reading package lists... Done
Building dependency tree
Reading state information... Done
Reading package lists... Done
Building dependency tree
Reading state information... Done
The following packages will be REMOVED
  libwine-development wine64-development
0 to upgrade, 0 to newly install, 2 to remove and 16 not to upgrade.
After this operation, 197 MB disk space will be freed.
Do you want to continue? [Y/n]
Note if you want to clean only the APT cache in Linux Mint then you can use only:
sudo apt-get autoclean
while
sudo apt-get autoremove
can be used to clean old packages.
Step 4. Delete systemd journal logs
Linux Mint keeps logs registering different events and messages like:
- System
- Security
- Hardware
- Applications
- and more
The amount of logs is growing and might take a good amount of space. In order to clean disk space by cleaning logs you can use next command:
sudo journalctl --vacuum-time=3d
If you like the amount of disk space taken by log journal you can do:
journalctl --disk-usage
This command might free 0.5 or 2.0 GB which might be nice for small disks.
Step 5. Removing the Flatpak packages
Flatpak is advertised as a utility for software deployment and package management for Linux. It contains many interesting and important apps and packages. But if you don't use it or disk space is more important than you can remove it.
THe first step is to verify if any of your apps are installed with Flatpak:
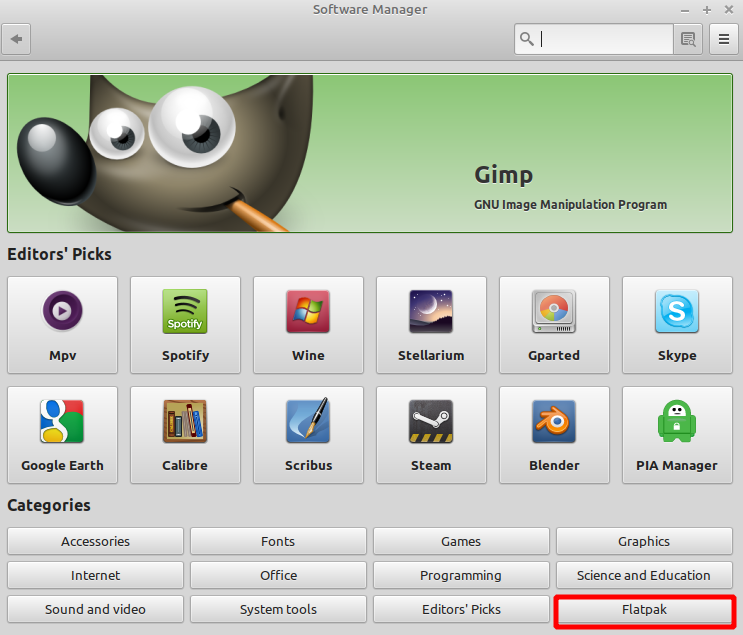
- Software manager
- Click on Flatpak button - down left corner
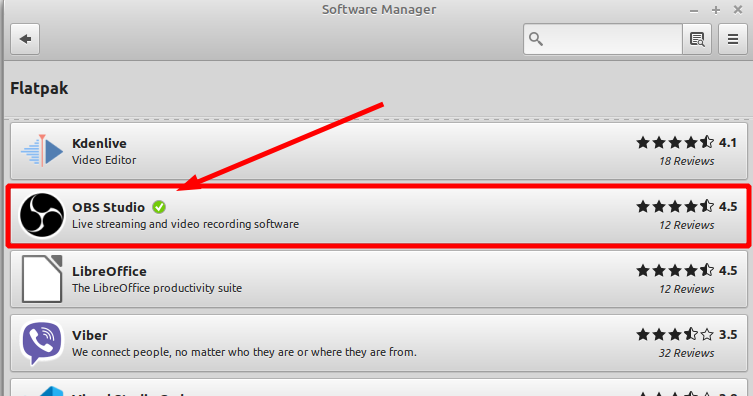
- The apps with installed with Flatpak has green circle with tick
- remove the apps if any


Final step will save huge amount of disk space by removing Flatpak - run this command in terminal:
sudo apt-get purge "*flatpak*"
Alternatively you can just remove the unused flatpack packages:
flatpak uninstall --unused
This command might save between 2 or 5.0 GB.
Step 6. Use tune2fs to save space
By default ext2, ext3, ex4 file systems allocate 5%-7% of the available blocks for use by the root user. This allows the system to continue running if non-root users fill up the file system. Use this only on extra partitions, data partitions or external drives formatted in ext2,3,4.
sudo tune2fs -m0 /dev/sda1
where the partition is: /dev/sda1
This might free 1.5 GB and more.
from man tune2fs:
DESCRIPTION
       tune2fs allows the  system  administrator  to  adjust  various  tunable
       filesystem  parameters  on  Linux ext2, ext3, or ext4 filesystems.  The
       current values of these options can be displayed by using the -l option
       to tune2fs(8) program, or by using the dumpe2fs(8) program.

       The  device  specifier can either be a filename (i.e., /dev/sda1), or a
       LABEL or UUID specifier: "LABEL=volume-name"  or  "UUID=uuid".   (i.e.,
       LABEL=home or UUID=e40486c6-84d5-4f2f-b99c-032281799c9d).
Bonus 1: Find and delete Duplicate Files
Duplicate files are another way to waste time - especially for big files. It can be video, music or archives. If you want to find and remove duplicate files on your Linux Mint you can use tool - FSlint which is a utility to find and clean various forms of lint on a filesystem:
- Duplicate files
- Problematic filenames
- Temporary files
- Bad symlinks
- Empty directories
- Nonstripped binaries
It's advertised as:
FSlint is a toolkit to clean filesystem lint. It includes a GTK+ GUI as well as a command line interface and can be used to reclaim disk space.
Bonus 2: Check Timeshift snapshots
Timeshift is a great tool which will come to the rescue when you have problems with your Linux Mint installation. This value comes at a price - disk space.
You can move your older snapshots to another drive or change the frequency on which they are taken.
Bonus 3: Clear Browser cache
Browsers can take considerable space for cache - especially for websites like Facebook and Youtube. Cleaning the cache might save up to 0.5 GB which is a considerable amount for smaller SSD disks which are common in laptops.
Bonus 4: Check and clear cache folders
There are some folders which cache or store back up information. In this section you can find many good candidates for cleaning like:
trash:///- the recycle bin~/.cache~/.cache/pip/http- Python cache folder for virtual environments
which contains GB of data.- you can use command -
pip cache infoorpip cache purge
- you can use command -
~/.cache/JetBrains- Tools like PyCharm, IntelliJ Idea - old versions and tools can be safely removed.toxfolders contain huge 'useless' data if the tox is not used frequently ( Python project specific ).local
Bonus 5: Remove Large Packages
You can identify the large packages in Linux Mint or Ubuntu by:
dpkg-query --show --showformat='${Package;-50}\t${Installed-Size}\n' | sort -k 2 -n | grep -v deinstall | awk '{printf "%.3f MB \t %s\n", $2/(1024), $1}'
You can find the largest packages sorted by size:
255.209 MB 	 libgl1-mesa-dri
294.100 MB 	 opera-stable
319.576 MB 	 code
323.625 MB 	 google-chrome-stable
336.087 MB 	 linux-modules-extra-5.15.0-92-generic
336.088 MB 	 linux-modules-extra-5.15.0-91-generic
336.518 MB 	 linux-modules-extra-5.15.0-88-generic
336.572 MB 	 linux-modules-extra-5.15.0-56-generic
338.975 MB 	 brave-browser
372.223 MB 	 mint-cursor-themes
990.909 MB 	 linux-firmware
To remove a package you can use:
sudo apt-get remove brave-browser
You can do the same from the package manager:
- Linux Mint Menu
- Search for Synaptic Package Manager
- sort packages by size
- mark packge for removal
- Apply
All this steps will ensure that you can free several extract GBs from your machine.


