


A quick and practical guide how to create custom commands and alias in Linux Mint/Ubuntu. A custom command can be any shell script, code or command. There are several different ways to create such commands and this article describe most of them.
Step #1: Create a directory for your custom scripts
You can create a directory by using the graphical interface of Linux Mint or Ubuntu - for example Nemo. This works fine except when the folder permissions don't allow this. In such cases or if you prefer to use terminal you can create new folder by:
mkdir Scripts
Step #2: Create test script - sh file
Next step is to create simple script for tests and verification are the changes working or not. Again you can use the user interface or terminal:
nano lowercase.sh
The content of the file should be like:
#!/bin/bash
echo lowercase
for i in $( ls | grep [A-Z] ); do mv -i $i `echo $i | tr 'A-Z' 'a-z'`; done
This script will change all files from Camel case to lower case - operation which I need to do every month. So I prefer to create shortcut in order to ease my life.
Step #3: Give permissions for execution
Next step is to give executing permissions for this file. One possible way if by:
- Right click on the file
- Properties
- Permissions
- Execute
- Check - Allow executing file as program
Or by using shell:
sudo chmod +x lowercase.sh
Note: you need to be in the folder Scripts
Step #4: Add the folder Scripts to your path
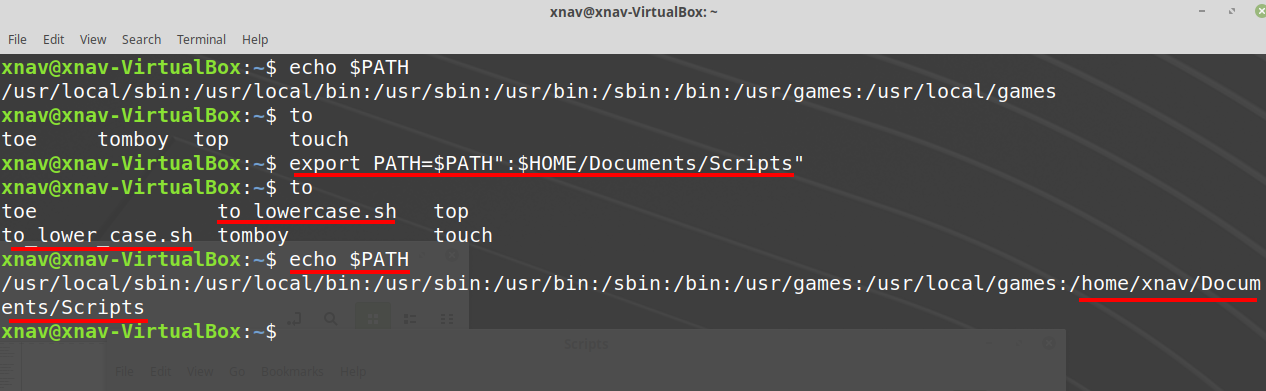
There are several ways to do this. The first one is if you want to add path temporary in order to test it. In this case you can do (assume that Scripts it's created in your Documents):
export PATH=$PATH":$HOME/Documents/Scripts"
The you can test is your script visible in your terminal by:
lowercase.sh
Even if you start typing lowe - and press tab you will see your script in the suggestions.
For permanent changes you need to update: ~/.bash_profile by:
sudo nano ~/.bash_profile
and add this line inside:
export PATH=$PATH:/home/xnav/Documents/Scripts
Note 1 You need to open a new terminal or refresh the existing one with:
source ~/.bash_profile
This is the content of my ~/.bash_profile:
export PATH=$PATH:/home/xnav/.go/bin

export GOPATH=/home/xnav/go

export PATH=$PATH:/home/xnav/go/bin

export PATH=$PATH:/home/xnav/Documents/Scripts
Note 2 Note that this works only for the current profile. You will need to repeat this step for new profiles or users. Alternatively you can search how to add path globally in Linux.
Now you can test and use your script by: his name:
lowercase.sh
Bonus Step #1: Create alias for a command
Another possible solution to add custom commands to your terminal is by using aliases. For simple commands I prefer to use alias while for big and complex scripts - adding custom scripts.
Following next steps you can find how to add alias:
- Open the local alias file
sudo nano ~/.bash_aliases
- Add your alias(es) like(commands can be chained with
&):
alias lsd='cd Documents & ls -l'

alias lss='echo test lss alia
- Open new terminal or reload the current one by:
source ~/.bash_aliases
And now you can use both aliases in your shell by typing:
- lsd
- lss
Bonus Step #2: Create file in system bin folder
If you have only one script you can create it in folder /bin. Then the script will be automatically recognized and added to your shells. In order to do this:
- Create zzz.sh file
sudo nano /bin/zzz.sh
- Add the file content:
#!/bin/bash
echo Test of script zzz
- Add executing permissions:
cd /bin/
sudo chmod +x zzz.sh
Now open terminal and test the execution of the script by:
zzz.sh
Bonus Step #3: Create file in your local bin folder
Create bin folder under your user. For example:
- Create local folder bin and zzz.sh file
mkdir ~/bin/
sudo nano ~/bin/zzz.sh
- Add executing permissions:
cd  ~/bin/
sudo chmod +x zzz.sh
- Test the execution of the script by:
zzz.sh
Note: You need to use exactly the name bin and it should be under home otherwise it will not work. Why is working. Because if you check your .profile file you will find the next:
sudo nano ~/.profile
So as you can see the next locations are considered in your profile:
$HOME/bin$HOME/.local/bin$HOME/.bashrc
~/.profile
# if running bash
if [ -n "$BASH_VERSION" ]; then
    # include .bashrc if it exists
    if [ -f "$HOME/.bashrc" ]; then
        . "$HOME/.bashrc"
    fi
fi

# set PATH so it includes user's private bin if it exists
if [ -d "$HOME/bin" ] ; then
    PATH="$HOME/bin:$PATH"
fi

# set PATH so it includes user's private bin if it exists
if [ -d "$HOME/.local/bin" ] ; then
    PATH="$HOME/.local/bin:$PATH"
fi